I really wish I could find an interface between Blogger and my brain, I have a lot of articles to write but can't get them posted fast enough. Although it's not the posting per se it's the typing and time to do it.
As I wait for a delivery of a Henry Vacuum cleaner as both vacuums in the house have been killed whilst cleaning up my decorating escapades. I thought I would at least start another article.
Labels And Drop Down Menus.
Strap yourself in and grab a coffee you are in for a wild ride. I wish someone had written a manual for DaVinci Resolve's hidden features. Currently, there are around a trillion snippets of information spilled over the internet. There is a massive manual but I think some of the pages must have fallen out. One day I may even write a manual, maybe when I retire to my narrowboat on the English canal network.
On a completely unrelated topic, I worked in the tourism industry for fifteen years and when based in Lanzarote airport their was a company called "Canal Tours" and the meet and greet person used to cover the letter "C" with his fingers when he was greeting flights.
Assumptions.
- You are on the fusion page
- You are either modifying an existing tool/effect or creating your own.
- The result will be a GroupOperator/MacroOperator
- The result can be for fusion, edit page, or cut page.
Labels
In this article, a label is referring to a label in the inspector to identify a section of controls.
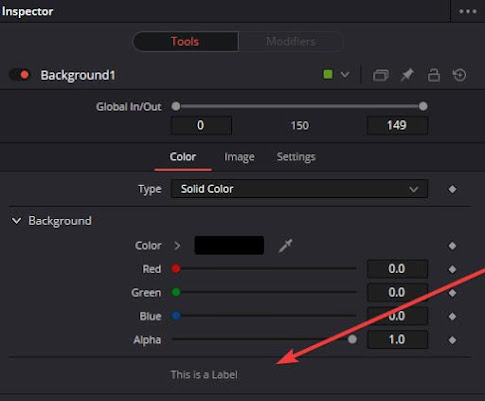 |
| Look at me, I managed a screenshot |
A label is the easiest thing I am going to write about today and needs a little forethought. A label is classed as a control and will always get placed at the bottom of the inspector. So it is best practice to create your label first before adding any other tools.
The only problem is when you want to add a label to an existing control. There are two ways to move the position of the label in the inspector, one is to edit the code the other is to select each individual control in the "edit controls" panel. Editing the code is far easier but I will explain both.
Adding a simple label gets even more confusing when building a macro as the label will end up on the wrong control page as most nodes do not have "Controls" as a page option. This is not an issue when editing the code as you can place the label anywhere you want with a simple cut & paste. Fixing this inside resolve is possible but currently, a pain in the arse as you have to use "edit controls" on the macro and resave it.
I suppose I should explain how to create a label in the first place as after all that is why you are here. There is more than one way so I will list both.
Official Way (which is limited to the number of labels you can add)
- Select the node you want the label on
- Right-click and choose "Edit Controls"
- Select the drop-down next to the ID: "NewControl"
- Select "Blank2" or "Blank5"
- Type the labels name above the "Blank2"
- Leave "Type" as "Number"
- Select the "Page" you want the label to be on
- Uncheck "Animatable"
- Check "Passive"
- Input Crtl select LabelControl
- Select "OK"
You have just created a basic label, this will appear in the inspector at the bottom of the page you selected.
Another Way (As many labels as you would like)
- Select the node you want the label(s) on
- Right-click and choose "Edit Controls"
- Over Type Name: "New Contol" with your label title
- Leave "Type" as "Number"
- Select the "Page" you want the label to be on
- Uncheck "Animatable"
- Check "Passive"
- Input Crtl select LabelControl
- Select "OK"
This method has created a new control which the "SourceOp" has the same name as your label. No need to know what "SourceOp" is just yet. In the previous version, the "SourceOp" was "Blank2"
As rearranging the position of labels and drop-down menus is the same I will move on to creating a drop-down and then wrap things up with how to move them.
Drop-down menus can be a real pain and I will state from the outset that the coding method is far quicker. However, it is possible to stay within resolve to add them and position them it just seems clunky.
If you have created a label then you have most of the steps down, we just need to tweak them.
Official Way (which is limited to the number of drop-downs you can add)
- Select the node you want the label on
- Right-click and choose "Edit Controls"
- Select the drop-down next to ID: "NewControl"
- Select "Blank2" or "Blank5"
- Type the labels name above the "Blank2"**
- Leave "Type" as "Number"
- Select the "Page" you want the label to be on
- Uncheck "Animatable"
- Check "Passive"
- In "Default" 0 is closed and 1 is open
- Input Crtl select LabelControl
- Check "Show Arrow"
- "Hide Next#" Enter the number of controls the drop-down will have below it. *
- "Nest Level" Same as "Hide Next"
- Select "OK"
* not easy as you haven't built the macro yet, this will either come with experience or we can change it directly in the code.
**There is an error known as name clash so be aware of what you call your drop-down. Avoid control names (Angle, Size) & Node Names, take special care when you have added any expressions as it will completely cock it up. I use Label01, Label02, etc, and change the name in the code, that way I can name it anything I want.
Before I continue I can hear those experienced macro builders shouting at the screen. Yes, there are other ways, however, if you haven't done it before this is, in my opinion, an easy way.
The next option for drop-down menus is a commitment to dabble with the code, although coding is far quicker and more powerful it is not for everyone. Saying that once you see the hoops you have to jump through to stay within resolve, I bet you take up coding.
The next option is in two parts, you add a drop-down inside fusion and then make it visible in the inspector by adding a few lines of code to the macro.
Another Way (As many drop-downs as you would like)
- Select the node you want the label on
- Right-click and choose "Edit Controls"
- Over Type Name: "New Contol" with your drop-down title**
- Leave "Type" as "Number"
- Select the "Page" you want the drop-down to be on
- Uncheck "Animatable"
- Check "Passive"
- In "Default" 0 is closed and 1 is open
- Input Crtl select LabelControl
- Check "Show Arrow"
- "Hide Next#" Enter the number of controls the drop-down will have below it. *
- "Nest Level" not required
- Select "OK"
* not easy as you haven't built the macro yet, this will either come with experience or we can change it directly in the code.
**There is an error known as name clash so be aware of what you call your drop-down. Avoid control names like Angle, Size & Node Names, take special care when you have added any expressions as it will completely cock it up. I use Label01, Label02, etc, and change the name in the code, that way I can name it anything I want afterward.
To make the "Another Way" drop-down visible in the inspector you have to complete building your GroupOperator/MacroOperator and then open it in a text editor.
Once you have created your composition and saved it as a .setting file you can view its contents in a text editor. The advantages to editing the code are:-
- It's a lot quicker than changing stuff inside resolve
- Move things around super easy
- Add custom attributes and sex it up
- Add comments and info
- Change default settings without rebuilding the macro/group
- Add links to internal/external websites
- Create a button which the user can use to run a script, run another app, open a popup window with previews in.
- Set the "F1" help key, and a whole lot more.
At the very top of the code, you are going to see something very similar to this:-
- {
- Tools = ordered() {
- DropDown = MacroOperator {
- Inputs = ordered() {
Line 4 is the start of the controls you see in the inspector. You would add the Label Code Snippet below line 4 but at the top of the control (node), you added the label to.
-- label instance
- Label = InstanceInput {
- SourceOp = "Text1",
- Source = "Label",
- },
-- end of label instance
Above is the code to add a label:-
--Label Instance is a comment
1. Label = InstanceInput { --Label is the name I gave my drop-down.
2. SourceOp = "Text1" -- This is the node I added the label to.
3. Source = "Label" --this must match the label title (not always)
4. }, --closes the code, the comma is important.
--end of label instance is a comment
That piece of code displays the drop-down in the inspector, however, if you didn't use "edit controls" inside fusion nothing happens. That code is lower down just below the actual tool.
I can hear you thinking, "Well that is as clear as mud". It takes some time to navigate your way around the code but after a few Years, Weeks, you get the hang of it.
What follows is the code for the title I made which consists of a "Background1" "Merge1" "Text1" and although there is a "MediaOut" in the fusion node graph, you don't have to include it in a macro. There are occasions when you do want to include a "MediaOut" in a macro.
I will break it down for you and later we will customise it.
All the green text is what you see in the inspector, these are the controls we checked in the "macro editor"
The text in Fuschia is the label we added, directly to the code.
The red text is the output, in fusion this would connect to the MediaOut. In the cut & edit page resolve handles this for you.
The yellow text is the code that makes up the node.
The aqua text is the label added using "edit controls" we can seriously customise this section.
--This is a comment
- {
- Tools = ordered() {
- DropDown = MacroOperator {
- Inputs = ordered() {
- -- label instance
- Label01 = InstanceInput {
- SourceOp = "Text1",
- Source = "Label01",
- },
- -- end of label instance
- Input1 = InstanceInput {
- SourceOp = "Text1",
- Source = "StyledText",
- },
- Input2 = InstanceInput {
- SourceOp = "Text1",
- Source = "Font",
- ControlGroup = 2,
- },
- Input3 = InstanceInput {
- SourceOp = "Text1",
- Source = "Style",
- ControlGroup = 2,
- },
- Input4 = InstanceInput {
- SourceOp = "Text1",
- Source = "Red1Clone",
- Name = "Color",
- ControlGroup = 3,
- Default = 1,
- },
- Input5 = InstanceInput {
- SourceOp = "Text1",
- Source = "Green1Clone",
- ControlGroup = 3,
- Default = 1,
- },
- Input6 = InstanceInput {
- SourceOp = "Text1",
- Source = "Blue1Clone",
- ControlGroup = 3,
- Default = 1,
- },
- Input7 = InstanceInput {
- SourceOp = "Text1",
- Source = "Alpha1Clone",
- ControlGroup = 3,
- Default = 1,
- },
- Input8 = InstanceInput {
- SourceOp = "Text1",
- Source = "Size",
- Default = 0.16,
- },
- Input9 = InstanceInput {
- SourceOp = "Text1",
- Source = "CharacterSpacingClone",
- Name = "Tracking",
- Default = 1,
- },
- -- label instance
- Label02 = InstanceInput {
- SourceOp = "Background1",
- Source = "Label02",
- },
- -- end of label instance
- Input10 = InstanceInput {
- SourceOp = "Background1",
- Source = "Type",
- },
- Input11 = InstanceInput {
- SourceOp = "Background1",
- Source = "TopLeftRed",
- Name = "Color",
- ControlGroup = 7,
- Default = 0,
- },
- Input12 = InstanceInput {
- SourceOp = "Background1",
- Source = "TopLeftGreen",
- ControlGroup = 7,
- Default = 0,
- },
- Input13 = InstanceInput {
- SourceOp = "Background1",
- Source = "TopLeftBlue",
- ControlGroup = 7,
- Default = 0,
- },
- },
- Outputs = {
- MainOutput1 = InstanceOutput {
- SourceOp = "Merge1",
- Source = "Output",
- }
- },
- ViewInfo = GroupInfo { Pos = { 0, 0 } },
- Tools = ordered() {
- Text1 = TextPlus {
- CtrlWZoom = false,
- Inputs = {
- Width = Input { Value = 1920, },
- Height = Input { Value = 1080, },
- UseFrameFormatSettings = Input { Value = 1, },
- ["Gamut.SLogVersion"] = Input { Value = FuID { "SLog2" }, },
- StyledText = Input { Value = "DROPDOWN", },
- Font = Input { Value = "Open Sans", },
- Style = Input { Value = "Bold", },
- Size = Input { Value = 0.16, },
- VerticalJustificationNew = Input { Value = 3, },
- HorizontalJustificationNew = Input { Value = 3, },
- ManualFontKerningPlacement = Input {
- Value = StyledText {
- Array = {
- },
- Value = ""
- },
- },
- },
- ViewInfo = OperatorInfo { Pos = { 990, -16.5 } },
- UserControls = ordered() {
- Label01 = {
- LINKS_Name = "Label01",
- LINKID_DataType = "Number",
- INPID_InputControl = "LabelControl",
- INP_Integer = false,
- LBLC_DropDownButton = true,
- LBLC_NumInputs = 9,
- INP_External = false,
- INP_Passive = true,
- }
- }
- },
- Background1 = Background {
- Inputs = {
- Width = Input { Value = 1920, },
- Height = Input { Value = 1080, },
- UseFrameFormatSettings = Input { Value = 1, },
- ["Gamut.SLogVersion"] = Input { Value = FuID { "SLog2" }, },
- TopLeftAlpha = Input { Value = 0, },
- },
- ViewInfo = OperatorInfo { Pos = { 880, 49.5 } },
- UserControls = ordered() {
- Label02 = {
- LINKS_Name = "Label02",
- LINKID_DataType = "Number",
- INPID_InputControl = "LabelControl",
- INP_Integer = false,
- LBLC_DropDownButton = true,
- LBLC_NumInputs = 4,
- INP_External = false,
- INP_Passive = true,
- }
- }
- },
- Merge1 = Merge {
- Inputs = {
- Background = Input {
- SourceOp = "Background1",
- Source = "Output",
- },
- Foreground = Input {
- SourceOp = "Text1",
- Source = "Output",
- },
- PerformDepthMerge = Input { Value = 0, },
- },
- ViewInfo = OperatorInfo { Pos = { 990, 49.5 } },
- }
- },
- }
- },
- ActiveTool = "DropDown"
- }
That is the basic overview of adding drop-down menus in the inspector via the code, let's take a look at how to do this within resolve.
Adding drop-down menus whilst staying inside resolve requires you to create the MacroOperator/GroupOperator and then bring it back into the fusion graph. There are several ways to bring it back in.
- Drag the .setting file from your computer into the node graph.
- Copy the .setting file and paste it into the fusion graph
- Add the macro to a timeline on the edit or cut page and then open it in fusion.
How to add a drop-down
- Select the node for your macro
- Right-click and select "edit controls"
- Over Type Name: "New Contol" with your drop-down title**
- Leave "Type" as "Number"
- Select the "Controls" page***
- Uncheck "Animatable"
- Check "Passive"
- In "Default" 0 is closed and 1 is open
- Input Crtl select LabelControl
- Check "Show Arrow"
- "Hide Next#" Enter the number of controls the drop-down will have below it. *
- "Nest Level" Same as "Hide Next"
- Select "OK"
* not easy as you haven't built the macro yet, this will either come with experience or we can change it directly in the code.
**There is an error known as name clash so be aware of what you call your drop-down. Avoid control names like Angle, Size & Node Names, take special care when you have added any expressions as it will completely cock it up. I use Label01, Label02, etc, and change the name in the code, that way I can name it anything I want afterward.
***The page for the label has to be the same as the page the controls appear in the inspector without the labels. Normally this will be "controls" unless you have customised it.
This is where the fun and games come in, you need to select the correct input from the "edit controls" drop-down menu to move the tool control below the label in the correct order.
I found that experimenting helps here, so to see how it works follow the list below, you can then rearrange the tool controls as you wish later.
- Select the node of your macro.
- Right-click and select "edit controls".
- Use the drop-down arrow next to the ID: NewControl
- Select "Input1"
- Change Page to "Controls"
- Select "OK"
What you see will be determined by the entries in these two sections.
"Hide Next#" Enter the number of controls the drop-down will have below it. *"Nest Level" Same as "Hide Next"
For example. You entered 1 in each, then you will see the "Styled Text" under the drop-down you created at the bottom of the inspector. You may need to open the drop-down to see it.
The annoying part is you now have to determine the correct number for both
"Hide Next#" Enter the number of controls the drop-down will have below it. *"Nest Level" Same as "Hide Next"
Followed by selecting the correct "Input1", "Input2" etc.
Did I mention changing the code was easier?
Once you have all the tool controls you require below your drop-down you need to
- Select the node
- Right-click select settings > SaveAs
- Save with a different name
Renaming is to avoid overwriting your original.
I am going to pause here so we can all take a breath, especially me, I need a coffee. In a future post, I will explain what customisation is possible and how to add multiple labels to one tool (node) after you built the macro (.setting).
I find changing and adapting the code far easier than playing inside resolve, so that's how we will be moving forward.
Thanks for taking the time to read this post and if you would like to buy me a coffee, pizza, narrowboat then it is greatly appreciated.

Comments
Post a Comment